ZoomSounds - WordPress Audio Player
Author: Digital Zoom Studio
Twitter: http://twitter.com/
Facebook: http://facebook.com/dzs
Support - via item comments
Audio Player Intro
Want a nifty, cutting-edge, retina-ready, responsive html5 audio player for your site ? ZoomSounds is the perfect candidate. With four skins to fit every brand, only one format required to function, ZoomSounds is the perfect choice for an audio player.
Audio Player Features
- HTML5 technology - this gallery uses the latest html5 tehniques to deliver a never seen before experience to your clients
- fully responsive - looks great from mobile to HD
- flash backup - ie7 and ie8 do not support html5, but those users are not forgetten, the sounds will play for them too via the flash player
- one mandatory format - the hard part is done by the player script in order for the user to have easy experience editing - only mp3 is required
- touch optimized - touch devices are not forgotten
- three skins - three full skins to fit every brand
- CSS3 technology - this player uses cutting-edge css3 definitions
- easy install - purchase, download the zip, read the docs
- iPhone / iPad optimized - this gallery has been optimized for Apple touch devices
- Android optimized - this component has been tested on Android 4.0 and works awesome
- developer / SASS powered - this component's CSS has been built on top of SASS which means SASS users will have an easy time modifying the skins. For non-SASS users it's no problem either because CSS files ( generated by SASS ) are provided
- plays from YouTube - streams YouTube audio
- plays from SoundCloud - streams SoundCloud audio with an API key
- 100% css skinable - want to make slight modifications to the skins ? The skins are 100% built from the css and it is very easy to edit with css knowledge
- SEO friendly - built with search engine optimization on mind from the ground up
- compatible with all major browsers, including IE - compatible from IE7 to IE10, Chrome, Safari and Firefox
Installation - top
There are two ways to install the plugin
Method 1 - Direct WordPress Install
- Just download the zip from your http://activeden.net/user/yourusername/downloads directory in a folder of your choosing.
- Unzip it with your preffered unziping utility. On Windows, there can be some warnings while unziping. Those are nothing to worry about if they appear, they are just Mac OS X files that cannot be read by Windows.
- Then in your wordpress installation, in the Plugins panel, click Add New like in this picture:
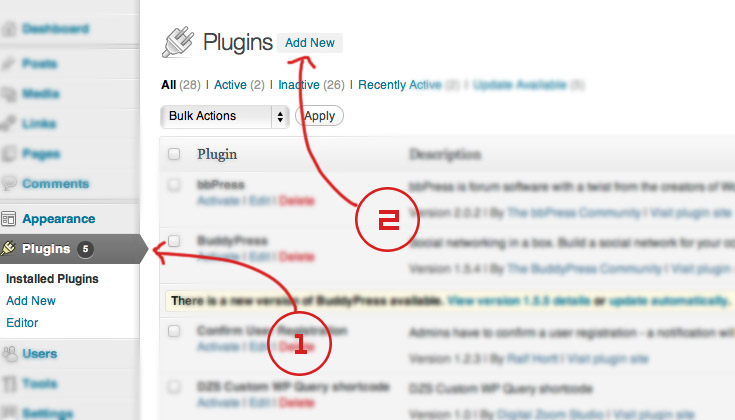
- Then click Upload, and select the zip you have downloaded from CC. Then click Activate.
- Access the admin panel from the ZoomSounds panel
- Add a new gallery from the Add Slider button.
- Start cusomizing to your needs. Have fun!
Method 2 - FTP Install
- Just download the zip from your http://activeden.net/user/yourusername/downloads directory in a folder of your choosing.
- Unzip it with your preffered unziping utility. On Windows, there can be some warnings while unziping. Those are nothing to worry about if they appear, they are just Mac OS X files that cannot be read by Windows.
- Then, if the folder dzs-zoomsounds is zipped, unzip that too. Then copy the folder in the wp-content/plugins folder
- Then in your wordpress installation, in the Plugins panel, locate DZSZoomSounds and click Activate
- Access the admin panel from your Dashboard > ZoomSounds
- Add a new gallery from the Add Slider button.
- Start cusomizing to your needs. Have fun!
_______________
You can now add audio galleries you create in the ZoomSounds Admin into any post or page. To make it simple a Shortcode Generator is included. You can access it via this button.

The first button is the shortcode genreator launcher and the second one ( the one with a plus ) ads a single audio player to the page from the media gallery.
The first button launches the Shortcode Generator
This video should help you setup your first audio file in no time.
_______________
Recommended: Some web servers don't have html5 media support yet. So if you notice your audios do not work ( and were properly uploaded ) an easy fix is to add this to to your .htaccess file:
AddType audio/mpeg3 .mp3
AddType audio/mp3 .mp3
AddType audio/x-mpeg3 .mp3
AddType audio/ogg .ogg
AddType audio/ogg .oga
Adding to the Post / Page - top
- access / create your post / page
- insert this shortcode
into the post / page
[zoomsounds id="default"]
- replace default with the id you have set in the admin panel

- All done!
Special Features- top
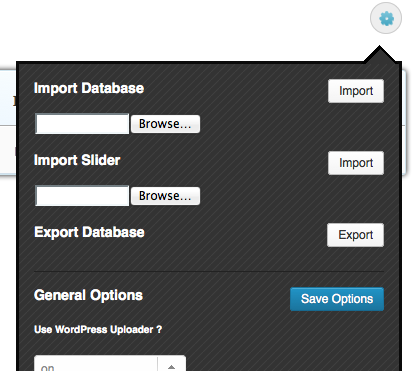
Import / Export Database -/- Gear Menu
Admin Menu Explained
slider
The main division in the admin panel, sliders are independent to each other, each slider has it's own items and main settings, you can add new sliders via the Add Slider button underneath the table. Multiple slidesrs with different ids can be added into one page.

items
The items are divisions of a slider. They each have their own settings and preview image which show up if the item is an image. The top right button deletes the item and the bottom left duplicates the item.

extra: in the timeline slider there are 3 types of items ( see Images, Marks and Milestones section above )
dzs multi uploader

If you have a modern browser ( and you should ) - you can use it's full power to bring you accesibility and easy uploading. Just drag and drop your images ( can be multiple ) and they will automatically added as image items.
Database Select

In the top area you will see a button stating the curent database. You can click on it and it will render a list of databases you have created to write galleries in. You can create new databases for galleries by writing a name for your new database in the lat item of the select database container. Once you have created your gallery in the database you can insert in the content via
Note: if you have many galleries, it is recommeded to distribute them accross multiple databases. So in the unlikely event one crashes, the other ones are safe.
Shortcode Attributes
The admin has plenty of sidenotes to explain every option. The admin generates shortcodes which in turn generates the front end player. Some attributes of the shortcode explained here like:
playerid - id of the zoomsounds custom post type for saving comments/ratings/etc.
cue - on/off -> for choosing if the sound should load when the page starts.
How to change Waveform Color and size
To change waveform color and size, go to ZoomSounds > Settings and change these seetings

As this is generated based on each track, you have to regenerate these files, by going to each track and clicking the Autogenerate Waveform Button again.
How to change player highlight color
To change waveform color and size, go to ZoomSounds > Player Configurations and change these seetings - Highlight Color

Save the player configuration and of course you have to select this Player Configuration in the ZoomSounds player or playlist you are using.
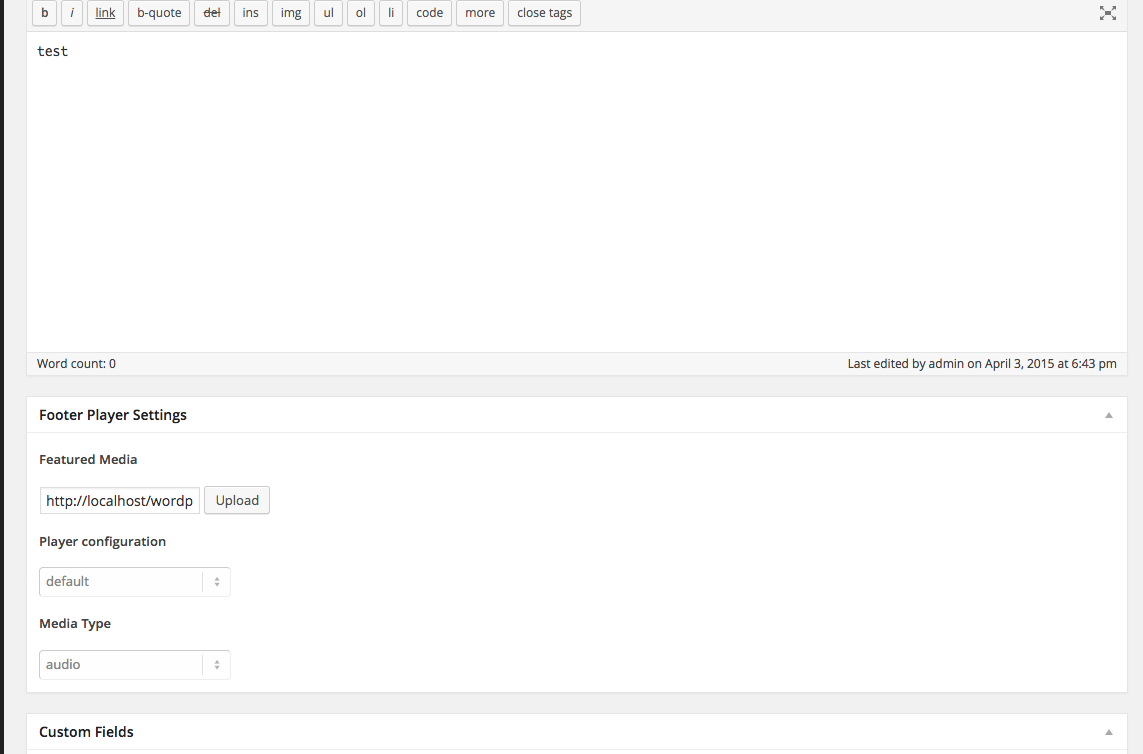
How to setup footer player / bottom player
Make sure in the page meta settings Source is set to fake
player configuration is set to the one you want and
type is set to fake

[zoomsounds_player source="http://localhost/wordpress/wp-content/uploads/2014/07/Santigold-Disparate-Youth.mp3" config="skinwavewithcomments" playerid="46" waveformbg="http://localhost/wordpress/wp-content/plugins/dzs-zoomsounds/waves/scrubbg_Santigold-Disparate-Youthmp3.png" waveformprog="http://localhost/wordpress/wp-content/plugins/dzs-zoomsounds/waves/scrubprog_Santigold-Disparate-Youthmp3.png" thumb="" autoplay="off" cue="on" enable_likes="off" enable_rates="off" enable_views="on" songname="Disparate Youth" artistname="" faketarget="#dzsap_footer"]
How to display WooCommerce grid
First of all, for the products that you want to display, you should set a track in the ZoomSounds tab we created in each WooCommerce Product.

You can also set waveform ( for skin-wave ) . If you want to show only a sample, you can do that. Just upload the sample in the Track field. Insert your full track in the Downloadable Items field ( from the General Tab ) and th/e users who purchase will be able to download that. Also if downloadable item is set, the waveform will be generated based on it ( must be mp3 )
To then show the grid, just go to a new page, setup a footer player
Then just insert this shortcode:
[dzsap_woo_grid type="product" style="style1" vpconfig="skinwavewithcomments" faketarget="#dzsap_footer" cats=""]
Video here - https://www.youtube.com/watch?v=Er2WgT99xDM&feature=youtu.be
Localization
You can read more about it here
The process to translate the plugin is fairly easy:
- download poedit
- go to the plugin folder ( wp-content/plugins/dzs-zoomsounds or in the package you receive from CC ) to the languages folder
- duplicate default.po and rename the dupe to dzsap-{region}_{language}.po -> for example for Spain / Spanish it's dzsap-es_ES.po you can find the format for each language in the link above
- open the newly renamed file in poedit - do the changes and save - a .mo file with the same name will be created - that will be the translation file
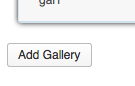
How to Create Your Own Gallery
The process is straightover, but we'll explain it here to make sure no one confuses any step. To create your own gallery, you just need to click the Add Gallery button.
Then, you will see in the table on top, a new gallery with the id default has been created. The next step is to click the Edit button refering to that gallery.

Now, all the settings of your new gallery will appear in the left, and the items of the gallery in the right.

The first step, is to edit the ID of the gallery to a more unique name then default, then you can edit any settings you will customize, and add as many items as you wish via the add button.

This plugin stores data in the WordPress database in a field 'dzsap_items' inside 'wp_options'.
Then it's easy to add it to any post / page via this simple shortcode [zoomsounds id="theidyouset"]
How to open a sound in ZoomBox
Just add these special attributes to the shortcode
[zoomsounds_player source="http://localhost/wordpress/wp-content/uploads/2012/06/rockshow.mp3" sourceogg="http://localhost/wordpress/wp-content/uploads/2013/11/adg3.ogg" config="skinwavewithcomments" playerid="3208" waveformbg="http://localhost/wordpress/wp-content/plugins/dzs-zoomsounds/waves/scrubbg_rockshowmp3.png" waveformprog="http://localhost/wordpress/wp-content/plugins/dzs-zoomsounds/waves/scrubprog_rockshowmp3.png" thumb="" openinzoombox="on"]open in zoombox[/zoomsounds_player]
The open in ZoomBox text can actuallybe any html code ( like images etc. )
Comments not working
...even though in the player configuration I have enabled the option comments enable to on.
Aditionally to this option, you need a media file on which to hook the comments. Your shortcode now probably looks like this:
[zoomsounds_player source="http://localhost/wordpress/wp-content/uploads/2012/06/rockshow.mp3" sourceogg="http://localhost/wordpress/wp-content/uploads/2013/11/adg3.ogg" config="skinwavewithcomments" playerid="" waveformbg="http://localhost/wordpress/wp-content/plugins/dzs-zoomsounds/waves/scrubbg_rockshowmp3.png" waveformprog="http://localhost/wordpress/wp-content/plugins/dzs-zoomsounds/waves/scrubprog_rockshowmp3.png" thumb="" openinzoombox="on"]open in zoombox[/zoomsounds_player]
You need to link to an existing Media item
[zoomsounds_player source="http://localhost/wordpress/wp-content/uploads/2012/06/rockshow.mp3" sourceogg="http://localhost/wordpress/wp-content/uploads/2013/11/adg3.ogg" config="skinwavewithcomments" playerid="46" waveformbg="http://localhost/wordpress/wp-content/plugins/dzs-zoomsounds/waves/scrubbg_rockshowmp3.png" waveformprog="http://localhost/wordpress/wp-content/plugins/dzs-zoomsounds/waves/scrubprog_rockshowmp3.png" thumb="" openinzoombox="on"]open in zoombox[/zoomsounds_player]
You get access to the Media Library by clicking Media in your WP Dashboard like so

in the bottom you can see the id ( 46 )
Also you can link gallery items to media library items ( for comments and likes recording )

How to place a SoundCloud sound
Just input your API key into the Settings screen.
Then just input this shortcode ( as an example )
[zoomsounds_player source="https://soundcloud.com/dubstep/stardust-by-james-egbert-schoolboy-ft-taylr-renee" config="skinwavewithcomments" playerid="3208" waveformbg="http://localhost/wordpress/wp-content/plugins/dzs-zoomsounds/waves/scrubbg_rockshowmp3.png" waveformprog="http://localhost/wordpress/wp-content/plugins/dzs-zoomsounds/waves/scrubprog_rockshowmp3.png" thumb="" autoplay="on" cue="on" enable_likes="off" enable_views="off"]
So you see in the source attribute you have to have the full link to the SoundCloud sound.
How to place a Private SoundCloud sound
Just input your API key into the Settings screen.
Then just input this shortcode ( as an example )
[zoomsounds_player source="https://soundcloud.com/dubstep/stardust-by-james-egbert-schoolboy-ft-taylr-renee" secret_token="xyz" config="skinwavewithcomments" playerid="3208" waveformbg="http://localhost/wordpress/wp-content/plugins/dzs-zoomsounds/waves/scrubbg_rockshowmp3.png" waveformprog="http://localhost/wordpress/wp-content/plugins/dzs-zoomsounds/waves/scrubprog_rockshowmp3.png" thumb="" autoplay="on" cue="on" enable_likes="off" enable_views="off"]
So you see in the source attribute you have to have the full link to the SoundCloud sound.
Warning - you will need a secret token from your private soundcloud track.
This is how to get one, first, go to the soundcloud file in your browser, and click the share button.

Then, click on the embed code, and find the secret_token portion.

How to place a ShoutCast ( Live Stream ) sound
You must first check if the stream is audio/mpeg. Let's take for example http://streamplus40.leonex.de:41364/if you open this in a browser you will see that Content Type: audio/mpeg
[zoomsounds_player type="shoutcast" source="http://streamplus40.leonex.de:41364/;" config="default" playerid="" waveformbg="" waveformprog="" thumb="https://lh5.googleusercontent.com/-RhXJ4O5JiEQ/UoKDBeGx5-I/AAAAAAAAAEU/Dkace1QwAKU/s80/smalllogo2.jpg" autoplay="on" cue="on" enable_likes="off" enable_views="off" playfrom=""]
How to Insert a Player with External Source
Just input this shortcode
[zoomsounds_player source="http://yoursite.com/linktoyour.mp3" config="default" playerid="" waveformbg="" waveformprog="" thumb="" autoplay="on" cue="on" enable_likes="off" enable_views="off"]
All you have to do is modify the source attribute value to match your mp3 location.
What is the difference between Wave Mode - canvas and Wave Mode - image
Canvas is the new wave generation method. The wave data generation happens only once on first track load ( on frontend ) . The wave data then remains saved in the database. This is much more customizable. You can change color and reflection size in the settings and the
Oposed to the Image wave mode ( deprecated ) which generates the wave image only in the admin. If changes are made to the color, then all the tracks waveform images must be regenerated.
The difference can actually be seen here - https://0.s3.envato.com/files/206819501/index.html if you open the left panel and set Wave Mode to Image.
How to Replicate Preview
Just watch this video
How to add waveforms to the media
- just go to your WordPress Dashboard > Media > Library
- add a new mp3 or edit the one you want
- press the Auto Generate button, then wait for the orange button to become bright
- you can now click the orange button and the location of the waveform generated waveform will appear in the field
- you can now click Update and the settings will be preserved.
- when you now use the create a new player from the media library button the waveforms will be imported automatically

What if the waveform turns out blank ?
We have build the flash generator to work flawless on most installs. And set up a direct link to PHP to save the waveform in png format and transmit the data to WordPress, it's a fairly advanced tehnique.
First, try to upgrade the php version on your host - as your host provider to do it.
If unfortunately this still generates blank pngs the solution is to generate the waveforms locally - you need to unpack the dzs-zoomsounds.zip you receive from CodeCanyon - and in the dzs-zoomsounds folder, save your mp3 as song.mp3 . Then click each of the buttons ( Save Static Waves Manual and Save Progress Waves Manual ) , save them on your computer, then upload to your server. On the Media page now you to input the Waveform Background and Waveform Progress fields with the location of each of these .pngs .
How to Activate Comments Chart
Go to ZoomSounds > Settings and check Activate Comments Widget
How to Place a Download Button in the Menu
Go to the gallery item you want to have the download links and input this in Menu Options > Extra HTML
<div class="file-icon download-button" style="display: inline-block"><a href="https://soundcloud.com/dubstep/stardust-by-james-egbert-schoolboy-ft-taylr-renee"><span class="header-clip"><span class="header-triangle"></span></span><span class="header-bg"></span><div class="clear"></div><div class="file-icon-inner"><i class="icon-download"></i> .mp3</div></a></div>
How to Place a Download Button in the Menu That Works Only After Rate or Comment
Go to the gallery item you want to have the download links and input this in Menu Options > Extra HTML
<div class="file-icon download-button download-after-rate" style="display: inline-block"><a href="https://soundcloud.com/dubstep/stardust-by-james-egbert-schoolboy-ft-taylr-renee"><span class="header-clip"><span class="header-triangle"></span></span><span class="header-bg"></span><div class="clear"></div><div class="file-icon-inner"><i class="icon-download"></i> .mp3</div></a></div>
note that the only difference is the download-after-rate class
How to setup the gallery with background changing
There is an example - index.html .
<div class="ap-wrapper center-ap" style="width:100%;">
<div class="the-bg" style=" background-image: url(img/bg.jpg);"></div>
[zoomsounds id="gal1"]
</div>
</div>
FAQ - top
You can check this link for a list of popular questions. Other questions you might have:
What is an youtube ID?
Take this movie for example - http://www.youtube.com/watch?v=UXLvR6ZaZk4 . The youtube ID is just this part: UXLvR6ZaZk4
Where are comments stored ?
They are in the Comments section of your dashboard. Linked to the mp3 media file.
How do I make my audio properly encoded to use ?
You only need mp3 for the player to function. This means the flash player backup will kick in for unsupported browsers. If you want full html5 playback, you need to add a ogg audio file.
The player won't start / broken
It might be because your mp3 is broken . Reencode it with - http://audio.online-convert.com/convert-to-mp3
Developer Tips - top
This gallery provides source files ( in the source folder ) so if you are developer you can start customizing it.
Recommended Programs
You can generally use any text editing software to edit most content/code, but this is what I recommend:
- .zip – Normally you could just right click and extract to a folder of choice [ on both Mac and Windows ]
- .html - Notepad++
- .js - Notepad++
- .as - Notepad++
- .fla - Flash CS5
- .xml – Notepad++
Make your own skin
- duplicate all .skin-wave references in audioplayer.cscs
- replace skin-wave with your skin-name
- you have a new skin named skin-name in where you can change any styling
- with a little css knowledge ,the possibilities are endless
How to disable right controls of audio player
You can disable skin-silver controls by going to Settings > Appearence and in extra css enter
.audioplayer.skin-silver .ap-controls .ap-controls-right{ display:none!important; }